"The designer's considerations in establishing any specification limits [for industrial tolerances or quality-control fit statistics] may be classified into three groups, namely, (1) those related to the service needs of the article or part for which specifications are being written, (2) those related to the capabilities of the production process to produce to any given specification limits, and (3) those related to the means to be used for determining whether the specifications are actually met by the product.
"The fundamental basis of all specification limits is, of course, the service need of the part or article. This is not primarily a statistical matter. However, it often happens that the service need can be judged more accurately with the aid of statistical methods. The viewpoint that every quality characteristic is a frequency distribution is always helpful. This is particularly true in matters involving the interrelationships of specification limits.
"There is no use specifying desired tolerances [fit levels] on any quality characteristic without some prospect that these tolerances can be met. Whenever production methods will not meet the proposed tolerances, this fact needs to be known and considered before such tolerances are adopted. The inability of any process to meet its quality specifications is sure to be responsible for extra costs. These may be costs of spoilage and rework, or of changing to another more expensive production process, or - in the case of dimensional tolerances - costs incident to giving up the idea of interchangeable manufacture [or generalizability of measures] and adopting selective fitting of parts [measures only useable in a specific context]. If such costs are to be undertaken, this should be done deliberately after weighing the facts rather than unconsciously because the capabilities of a production process are unknown. One of the major contributions of statistical quality control to design can be in the information the control chart [fit plot] gives about the capacity of a production process to meet any given tolerances.
"The third matter which was stated as relevant in setting specification limits is the means to be used for determining whether the specification limits are actually met. Both Shewhart and Simon have emphasized in their writings the distinction between a design specification, i.e., what is desired, and an acceptance specification, the means of judging whether

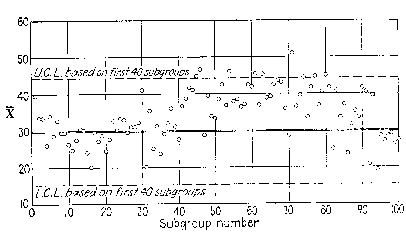
Figure. Typical industrial quality-control chart, showing drift towards Upper Control Line.
what is desired is actually obtained. The relevance of the acceptance specification in determining the design specification is not always understood. Both design engineers and inspection executives sometimes say, `It is the designer's [test constructors] job to specify what is needed; it is the inspector's [analyst's] job to devise [statistical] tests and acceptance procedures to find out whether the designer's specifications have been met; let each stick to his own job.' This fails to take into account the fact that, although the designer [test constructor] may not devise [statistical] tests and acceptance procedures, he should not be indifferent to the tests and acceptance procedures that are to be applied. These constitute useful information for the designer for the same reason that he should know something about the capabilities of the production process; both influence the likelihood of obtaining what is specified."
Excerpted from Eugene L. Grant (1952) Statistical Quality Control. 2nd. Edn. New York: McGraw-Hill.
Shewhart W.A. (1931) Economic Control of Quality of Manufactured Product. New York: D. Van Nostrand Co.
Shewhart W.A. (1939) Statistical Method from the Viewpoint of Quality Control. W.E. Deming, Editor. Washington DC: Department of Agriculture.
Simon L.E. (1941) An Engineers' Manual of Statistical Methods. New York: John Wiley & Sons, Inc.
Rasch Fit and Industrial Tolerances Linacre J … Rasch Measurement Transactions, 1999, 12:4 p.
| Forum | Rasch Measurement Forum to discuss any Rasch-related topic |
Go to Top of Page
Go to index of all Rasch Measurement Transactions
AERA members: Join the Rasch Measurement SIG and receive the printed version of RMT
Some back issues of RMT are available as bound volumes
Subscribe to Journal of Applied Measurement
Go to Institute for Objective Measurement Home Page. The Rasch Measurement SIG (AERA) thanks the Institute for Objective Measurement for inviting the publication of Rasch Measurement Transactions on the Institute's website, www.rasch.org.
| Coming Rasch-related Events | |
|---|---|
| Jan. 16 - Feb. 13, 2025, Fri.-Fri. | On-line workshop: Rasch Measurement - Core Topics (E. Smith, Winsteps), www.statistics.com |
| Apr. 8 - Apr. 11, 2026, Wed.-Sat. | National Council for Measurement in Education - Los Angeles, CA, ncme.org/events/2026-annual-meeting |
| Apr. 8 - Apr. 12, 2026, Wed.-Sun. | American Educational Research Association - Los Angeles, CA, www.aera.net/AERA2026 |
| May. 15 - June 12, 2026, Fri.-Fri. | On-line workshop: Rasch Measurement - Core Topics (E. Smith, Winsteps), www.statistics.com |
| June 19 - July 25, 2026, Fri.-Sat. | On-line workshop: Rasch Measurement - Further Topics (E. Smith, Winsteps), www.statistics.com |
The URL of this page is www.rasch.org/rmt/rmt124j.htm
Website: www.rasch.org/rmt/contents.htm